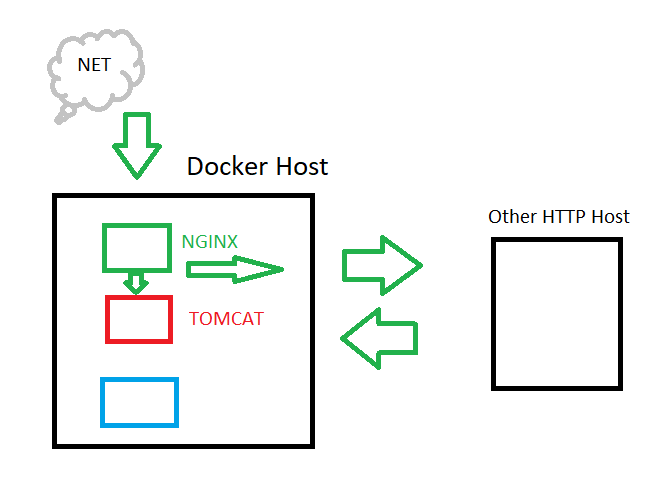
Let’s say that you have a web server, such as NGINX or Apache, running within a Docker container, and functions as a reverse proxy for other web services deeper within your network.

It would be nice to have Fail2Ban configured on your public-facing NGINX server, right? Let’s walk through how to set this up. I’ll be focusing on NGINX in this article, but the Apache configurations shouldn’t be too difficult to retrofit.
Possible Configurations
There’s a number of ways that we might be able to accomplish this.
- Configure the NGINX container to have Fail2Ban built into the image.
- Configure a separate Fail2Ban container.
- Configure Fail2Ban on the Docker host.
Option #1 should be easy enough to accomplish, but maybe you don’t want to build out a pipeline to do so, or don’t have the resources. Option #2 sounds overly complicated, and will likely involve even-more-than-usual root access within a container (not a great idea). We have access to the Docker host in this scenario, so let’s go with option #3.

Configure NGINX Container Logging
In this example, let’s just map the NGINX logs to a volume mounted on the Docker host. You could work through syslog or journald for this, but it’s probably easiest to simply mount /var/log/WEBSERVER onto your Docker host.
# Something like this is a good start.

$ mkdir -p /opt/container_webservice/logs

$ docker run -d --name=nginx -v /opt/container_webservice/etc/:/etc/nginx/conf.d/nginx.conf:ro -v /opt/container_webservice/logs:/var/log/nginx:rw nginx
By mounting the NGINX log folder, the output will no longer be printed to whatever your container logging driver; it’ll go straight into the files, instead. However, normal NGINX startup info will still be printed to the Docker log.
$ docker run -ti --rm -v /var/lib/docker/persistent-volumes/test:/var/log/nginx:rw --name=test-nginx -p 8089:80 nginx

/docker-entrypoint.sh: /docker-entrypoint.d/ is not empty, will attempt to perform configuration

/docker-entrypoint.sh: Looking for shell scripts in /docker-entrypoint.d/

/docker-entrypoint.sh: Launching /docker-entrypoint.d/10-listen-on-ipv6-by-default.sh

10-listen-on-ipv6-by-default.sh: info: Getting the checksum of /etc/nginx/conf.d/default.conf

10-listen-on-ipv6-by-default.sh: info: Enabled listen on IPv6 in /etc/nginx/conf.d/default.conf

/docker-entrypoint.sh: Launching /docker-entrypoint.d/20-envsubst-on-templates.sh

/docker-entrypoint.sh: Configuration complete; ready for start up

^C

$
If you would like your different sites to get logged to different files, you’ll just have more integrations to do with Fail2Ban. You can set this with access_log and error_log options in the nginx.conf file.
Configuring Fail2Ban jail.local
Now that we know that Fail2Ban can read the log files output from the NGINX container, let’s install Fail2Ban on your Docker host.
# Debian based distros. Your mileage may vary.

$ sudo apt-get install fail2ban
# Enterprise Linux distros
$ sudo yum install fail2ban
Next, we need to configure your jails, and configure any subnets or individual IP addresses that need to be ignored. I won’t go into too much detail, since there’s a lot of resources out there on how to configure Fail2Ban jails.
You should end up with something like this for your /etc/fail2ban/jail.local file.
[DEFAULT]

ignoreip = 192.168.1.0/24

bantime = 600

maxretry = 3
[nginx-http-auth]
enabled = true
port = http,https
[nginx-limit-req]
enabled = true
port = http,https
[nginx-botsearch]
enabled = true
port = http,https
maxretry = 2
[php-url-fopen]
enabled = true
port = http,https
However, this isn’t a traditional install, is it? Let’s specify the volume path that we provided to the Docker container.
[DEFAULT]

ignoreip = 192.168.1.0/24

bantime = 600

maxretry = 3
[nginx-http-auth]
enabled = true
port = http,https
logpath = /opt/container_webservice/logs/error.log
[nginx-limit-req]
enabled = true
port = http,https
logpath = /opt/container_webservice/logs/error.log
[nginx-botsearch]
enabled = true
port = http,https
maxretry = 2
logpath = /opt/container_webservice/logs/error.log
[php-url-fopen]
enabled = true
port = http,https
logpath = /opt/container_webservice/logs/access.log
Awesome, we’re mostly done with the local configuration, now.
Banning Doesn’t Work Yet…
If we were to restart the Fail2Ban service, and trigger a banning event, we’d notice a firewall rule would be published properly by Fail2Ban, but it wouldn’t limit access properly.
$ sudo iptables -L

Chain INPUT (policy ACCEPT)

target prot opt source destination

f2b-nginx-http-auth tcp -- anywhere anywhere multiport dports http,https
Chain FORWARD (policy DROP)
target prot opt source destination
DOCKER-USER all -- anywhere anywhere
DOCKER-ISOLATION-STAGE-1 all -- anywhere anywhere
ACCEPT all -- anywhere anywhere ctstate RELATED,ESTABLISHED
DOCKER all -- anywhere anywhere
ACCEPT all -- anywhere anywhere
ACCEPT all -- anywhere anywhere
...
Chain DOCKER (1 references)
target prot opt source destination
ACCEPT tcp -- anywhere 172.17.0.8 tcp dpt:http
...
Chain f2b-nginx-http-auth (1 references)
target prot opt source destination
REJECT all -- 192.168.1.179 anywhere reject-with icmp-port-unreachable
RETURN all -- anywhere anywhere
Why are we experiencing this behavior, when it works just fine on a normal host? Well, that’s because this isn’t a normal install!
Normal system traffic traditionally comes across on the INPUT chain, while Docker container traffic is sent through the FORWARD chain. Reference
Let’s configure Fail2Ban to operate on the proper chain, then!
Banning on the FORWARD Chain
If you look in the default /etc/fail2ban/jail.conf file, you’ll probably see the default banaction = iptables-multiport value. Let’s take a look inside of this file.

You can see that the action is configured to point to <chain>. We could modify this file directly, but it’d likely break during an update, since Fail2Ban puts package maintained configurations in /etc/. You generally don’t want to do that as a package maintaner, but nonetheless…
Let’s look at what the <chain> value is set to in that iptables-common.conf file.

Bingo! Let’s make our changes, now. Let’s copy both files into a new set of configurations (that won’t be overwritten during package updates) that modify the FORWARD chain.
$ cd /etc/fail2ban/action.d

cat iptables-common.conf > iptables-common-forward.conf

sed -i 's/INPUT/FORWARD/g' iptables-common-forward.conf
cat iptables-multiport.conf > iptables-multiport-forward.conf
sed -i 's/iptables-common.conf/iptables-common-forward.conf/g' iptables-multiport-forward.conf
The final step here is to reconfigure our /etc/fail2ban/jail.local file to use our new banaction for each jail we want to configure.
[DEFAULT]

ignoreip = 192.168.1.0/24

bantime = 600

maxretry = 3
[nginx-http-auth]
enabled = true
port = http,https
logpath = /opt/container_webservice/logs/error.log
banaction = iptables-multiport-forward
[nginx-limit-req]
enabled = true
port = http,https
logpath = /opt/container_webservice/logs/error.log
banaction = iptables-multiport-forward
[nginx-botsearch]
enabled = true
port = http,https
maxretry = 2
logpath = /opt/container_webservice/logs/error.log
banaction = iptables-multiport-forward
[php-url-fopen]
enabled = true
port = http,https
logpath = /opt/container_webservice/logs/access.log
banaction = iptables-multiport-forward
Now let’s restart Fail2Ban.
systemctl restart fail2ban.service
Validating FORWARD Chain Behavior
We should now have different behavior through iptables than we had before. Trigger a ban, and let’s review the firewall rules this time.
$ sudo iptables -L

Chain INPUT (policy ACCEPT)
Chain FORWARD (policy DROP)
target prot opt source destination
f2b-nginx-http-auth tcp -- anywhere anywhere multiport dports http,https
DOCKER-USER all -- anywhere anywhere
DOCKER-ISOLATION-STAGE-1 all -- anywhere anywhere
ACCEPT all -- anywhere anywhere ctstate RELATED,ESTABLISHED
DOCKER all -- anywhere anywhere
ACCEPT all -- anywhere anywhere
ACCEPT all -- anywhere anywhere
...
Chain DOCKER (1 references)
target prot opt source destination
ACCEPT tcp -- anywhere 172.17.0.7 tcp dpt:http
...
Chain f2b-nginx-http-auth (1 references)
target prot opt source destination
REJECT all -- 192.168.1.179 anywhere reject-with icmp-port-unreachable
RETURN all -- anywhere anywhere
Great! We can see that our f2b-nginx-http-auth rule has moved down from the INPUT chain to the FORWARD chain.
Now, if you read that Docker and iptables article I previously linked, it states that any custom rules to be applied before routing to a Docker container should be added to the DOCKER-USER chain. It’s not too big of a deal in this case, since Fail2Ban should always insert itself at the top of whatever firewall chain it’s operating within, but feel free to change your configurations above to honor this.
Thanks for reading. I hope this was useful!